/*! elementor-pro - v3.27.0 - 10-03-2025 */ /******/ (() => { // webpackBootstrap /******/ "use strict"; /*!**************************************************************!*\ !*** ../modules/screenshots/assets/js/preview/screenshot.js ***! \**************************************************************/ /* global ElementorScreenshotConfig */ class Screenshot extends elementorModules.ViewModule { getDefaultSettings() { return { empty_content_headline: 'Empty Content.', crop: { width: 1200, height: 1500 }, excluded_external_css_urls: ['https://kit-pro.fontawesome.com'], external_images_urls: ['https://i.ytimg.com' // Youtube images domain. ], timeout: 15000, // Wait until screenshot taken or fail in 15 secs. render_timeout: 5000, // Wait until all the element will be loaded or 5 sec and then take screenshot. timerLabel: null, timer_label: `${ElementorScreenshotConfig.post_id} - timer`, image_placeholder: 'data:image/gif;base64,R0lGODlhAQABAIAAAP///wAAACwAAAAAAQABAAACAkQBADs=', isDebug: elementorCommonConfig.isElementorDebug, isDebugSvg: false, ...ElementorScreenshotConfig }; } getDefaultElements() { const $elementor = jQuery(ElementorScreenshotConfig.selector); const $sections = $elementor.find('.elementor-section-wrap > .elementor-section, .elementor > .elementor-section'); return { $elementor, $sections, $firstSection: $sections.first(), $notElementorElements: elementorCommon.elements.$body.find('> *:not(style, link)').not($elementor), $head: jQuery('head') }; } onInit() { super.onInit(); this.log('Screenshot init', 'time'); /** * Hold the timeout timer * * @type {number|null} */ this.timeoutTimer = setTimeout(this.screenshotFailed.bind(this), this.getSettings('timeout')); return this.captureScreenshot(); } /** * The main method for this class. */ captureScreenshot() { if (!this.elements.$elementor.length) { elementorCommon.helpers.consoleWarn('Screenshots: The content of this page is empty, the module will create a fake conent just for this screenshot.'); this.createFakeContent(); } this.removeUnnecessaryElements(); this.handleIFrames(); this.removeFirstSectionMargin(); this.handleLinks(); this.loadExternalCss(); this.loadExternalImages(); return Promise.resolve().then(this.createImage.bind(this)).then(this.createImageElement.bind(this)).then(this.cropCanvas.bind(this)).then(this.save.bind(this)).then(this.screenshotSucceed.bind(this)).catch(this.screenshotFailed.bind(this)); } /** * Fake content for documents that dont have any content. */ createFakeContent() { this.elements.$elementor = jQuery('
').css({ height: this.getSettings('crop.height'), width: this.getSettings('crop.width'), display: 'flex', alignItems: 'center', justifyContent: 'center' }); this.elements.$elementor.append(jQuery('

').css({ fontSize: '85px' }).html(this.getSettings('empty_content_headline'))); document.body.prepend(this.elements.$elementor); } /** * CSS from another server cannot be loaded with the current dom to image library. * this method take all the links from another domain and proxy them. */ loadExternalCss() { const excludedUrls = [this.getSettings('home_url'), ...this.getSettings('excluded_external_css_urls')]; const notSelector = excludedUrls.map(url => `[href^="${url}"]`).join(', '); jQuery('link').not(notSelector).each((index, el) => { const $link = jQuery(el), $newLink = $link.clone(); $newLink.attr('href', this.getScreenshotProxyUrl($link.attr('href'))); this.elements.$head.append($newLink); $link.remove(); }); } /** * Make a proxy to images urls that has some problems with cross origin (like youtube). */ loadExternalImages() { const selector = this.getSettings('external_images_urls').map(url => `img[src^="${url}"]`).join(', '); jQuery(selector).each((index, el) => { const $img = jQuery(el); $img.attr('src', this.getScreenshotProxyUrl($img.attr('src'))); }); } /** * Html to images libraries can not snapshot IFrames * this method convert all the IFrames to some other elements. */ handleIFrames() { this.elements.$elementor.find('iframe').each((index, el) => { const $iframe = jQuery(el), $iframeMask = jQuery('
', { css: { background: 'gray', width: $iframe.width(), height: $iframe.height() } }); $iframe.before($iframeMask); $iframe.remove(); }); } /** * Remove all the sections that should not be in the screenshot. */ removeUnnecessaryElements() { let currentHeight = 0; this.elements.$sections.filter((index, el) => { let shouldBeRemoved = false; if (currentHeight >= this.getSettings('crop.height')) { shouldBeRemoved = true; } currentHeight += jQuery(el).outerHeight(); return shouldBeRemoved; }).each((index, el) => { el.remove(); }); // Some 3rd party plugins inject elements into the dom, so this method removes all // the elements that was injected, to make sure that it capture a screenshot only of the post itself. this.elements.$notElementorElements.remove(); } /** * Some urls make some problems to the svg parser. * this method convert all the urls to just '/'. */ handleLinks() { elementorCommon.elements.$body.find('a').attr('href', '/'); } /** * Remove unnecessary margin from the first element of the post (singles and footers). */ removeFirstSectionMargin() { this.elements.$firstSection.css({ marginTop: 0 }); } /** * Creates a png image. * * @return {Promise} URI containing image data */ createImage() { const pageLoadedPromise = new Promise(resolve => { window.addEventListener('load', () => { resolve(); }); }); const timeOutPromise = new Promise(resolve => { setTimeout(() => { resolve(); }, this.getSettings('render_timeout')); }); return Promise.race([pageLoadedPromise, timeOutPromise]).then(() => { this.log('Start creating screenshot.'); if (this.getSettings('isDebugSvg')) { domtoimage.toSvg(document.body, { imagePlaceholder: this.getSettings('image_placeholder') }).then(svg => this.download(svg)); return Promise.reject('Debug SVG.'); } // TODO: Extract to util function. const isSafari = /^((?!chrome|android).)*safari/i.test(window.userAgent); // Safari browser has some problems with the images that dom-to-images // library creates, so in this specific case the screenshot uses html2canvas. // Note that dom-to-image creates more accurate screenshot in "not safari" browsers. if (isSafari) { this.log('Creating screenshot with "html2canvas"'); return html2canvas(document.body).then(canvas => { return canvas.toDataURL('image/png'); }); } this.log('Creating screenshot with "dom-to-image"'); return domtoimage.toPng(document.body, { imagePlaceholder: this.getSettings('image_placeholder') }); }); } /** * Download a uri, use for debugging the svg that created from dom to image libraries. * * @param {string} uri */ download(uri) { const $link = jQuery('', { href: uri, download: 'debugSvg.svg', html: 'Download SVG' }); elementorCommon.elements.$body.append($link); $link.trigger('click'); } /** * Creates fake image element to get the size of the image later on. * * @param {string} dataUrl * @return {Promise} Image Element */ createImageElement(dataUrl) { const image = new Image(); image.src = dataUrl; return new Promise(resolve => { image.onload = () => resolve(image); }); } /** * Crop the image to requested sizes. * * @param {HTMLImageElement} image * @return {Promise} Canvas */ cropCanvas(image) { const width = this.getSettings('crop.width'); const height = this.getSettings('crop.height'); const cropCanvas = document.createElement('canvas'), cropContext = cropCanvas.getContext('2d'), ratio = width / image.width; cropCanvas.width = width; cropCanvas.height = height > image.height ? image.height : height; cropContext.drawImage(image, 0, 0, image.width, image.height, 0, 0, image.width * ratio, image.height * ratio); return Promise.resolve(cropCanvas); } /** * Send the image to the server. * * @param {HTMLCanvasElement} canvas * @return {Promise} Screenshot URL */ save(canvas) { return new Promise((resolve, reject) => { elementorCommon.ajax.addRequest('screenshot_save', { data: { post_id: this.getSettings('post_id'), screenshot: canvas.toDataURL('image/png') }, success: url => { this.log(`Screenshot created: ${encodeURI(url)}`); resolve(url); }, error: () => { this.log('Failed to create screenshot.'); reject(); } }); }); } /** * Mark this post screenshot as failed. */ markAsFailed() { return new Promise((resolve, reject) => { elementorCommon.ajax.addRequest('screenshot_failed', { data: { post_id: this.getSettings('post_id') }, success: () => { this.log(`Marked as failed.`); resolve(); }, error: () => { this.log('Failed to mark this screenshot as failed.'); reject(); } }); }); } /** * @param {string} url * @return {string} Screenshot Proxy URL */ getScreenshotProxyUrl(url) { return `${this.getSettings('home_url')}?screenshot_proxy&nonce=${this.getSettings('nonce')}&href=${url}`; } /** * Notify that the screenshot has been succeed. * * @param {string} imageUrl */ screenshotSucceed(imageUrl) { this.screenshotDone(true, imageUrl); } /** * Notify that the screenshot has been failed. * * @param {Error} e */ screenshotFailed(e) { this.log(e, null); this.markAsFailed().then(() => this.screenshotDone(false)); } /** * Final method of the screenshot. * * @param {boolean} success * @param {string} imageUrl */ screenshotDone(success) { let imageUrl = arguments.length > 1 && arguments[1] !== undefined ? arguments[1] : null; clearTimeout(this.timeoutTimer); this.timeoutTimer = null; // Send the message to the parent window and not to the top. // e.g: The `Theme builder` is loaded into an iFrame so the message of the screenshot // should be sent to the `Theme builder` window and not to the top window. window.parent.postMessage({ name: 'capture-screenshot-done', success, id: this.getSettings('post_id'), imageUrl }, '*'); this.log(`Screenshot ${success ? 'Succeed' : 'Failed'}.`, 'timeEnd'); } /** * Log messages for debugging. * * @param {any} message * @param {string?} timerMethod */ log(message) { let timerMethod = arguments.length > 1 && arguments[1] !== undefined ? arguments[1] : 'timeLog'; if (!this.getSettings('isDebug')) { return; } // eslint-disable-next-line no-console console.log('string' === typeof message ? `${this.getSettings('post_id')} - ${message}` : message); if (timerMethod) { // eslint-disable-next-line no-console console[timerMethod](this.getSettings('timer_label')); } } } jQuery(() => { new Screenshot(); }); /******/ })() ; //# sourceMappingURL=screenshot.js.map/*! * jQuery blockUI plugin * Version 2.70.0-2014.11.23 * Requires jQuery v1.7 or later * * Examples at: http://malsup.com/jquery/block/ * Copyright (c) 2007-2013 M. Alsup * Dual licensed under the MIT and GPL licenses: * http://www.opensource.org/licenses/mit-license.php * http://www.gnu.org/licenses/gpl.html * * Thanks to Amir-Hossein Sobhi for some excellent contributions! */ (function(){"use strict";function e(b){b.fn._fadeIn=b.fn.fadeIn;var p=b.noop||function(){},h=/MSIE/.test(navigator.userAgent),k=/MSIE 6.0/.test(navigator.userAgent)&&!/MSIE 8.0/.test(navigator.userAgent),y=(document.documentMode,b.isFunction(document.createElement("div").style.setExpression)),m=(b.blockUI=function(e){t(window,e)},b.unblockUI=function(e){v(window,e)},b.growlUI=function(e,o,t,n){function i(e){b.blockUI({message:s,fadeIn:void 0!==(e=e||{}).fadeIn?e.fadeIn:700,fadeOut:void 0!==e.fadeOut?e.fadeOut:1e3,timeout:void 0!==e.timeout?e.timeout:t,centerY:!1,showOverlay:!1,onUnblock:n,css:b.blockUI.defaults.growlCSS})}var s=b('
');e&&s.append("

"+e+"

"),o&&s.append("

"+o+"

"),void 0===t&&(t=3e3),i(),s.css("opacity");s.mouseover(function(){i({fadeIn:0,timeout:3e4});var e=b(".blockMsg");e.stop(),e.fadeTo(300,1)}).mouseout(function(){b(".blockMsg").fadeOut(1e3)})},b.fn.block=function(e){var o;return this[0]===window?(b.blockUI(e),this):(o=b.extend({},b.blockUI.defaults,e||{}),this.each(function(){var e=b(this);o.ignoreIfBlocked&&e.data("blockUI.isBlocked")||e.unblock({fadeOut:0})}),this.each(function(){"static"==b.css(this,"position")&&(this.style.position="relative",b(this).data("blockUI.static",!0)),this.style.zoom=1,t(this,e)}))},b.fn.unblock=function(e){return this[0]===window?(b.unblockUI(e),this):this.each(function(){v(this,e)})},b.blockUI.version=2.7,b.blockUI.defaults={message:"

Please wait...

",title:null,draggable:!0,theme:!1,css:{padding:0,margin:0,width:"30%",top:"40%",left:"35%",textAlign:"center",color:"#000",border:"3px solid #aaa",backgroundColor:"#fff",cursor:"wait"},themedCSS:{width:"30%",top:"40%",left:"35%"},overlayCSS:{backgroundColor:"#000",opacity:.6,cursor:"wait"},cursorReset:"default",growlCSS:{width:"350px",top:"10px",left:"",right:"10px",border:"none",padding:"5px",opacity:.6,cursor:"default",color:"#fff",backgroundColor:"#000","-webkit-border-radius":"10px","-moz-border-radius":"10px","border-radius":"10px"},iframeSrc:/^https/i.test(window.location.href||"")?"javascript:false":"about:blank",forceIframe:!1,baseZ:1e3,centerX:!0,centerY:!0,allowBodyStretch:!0,bindEvents:!0,constrainTabKey:!0,fadeIn:200,fadeOut:400,timeout:0,showOverlay:!0,focusInput:!0,focusableElements:":input:enabled:visible",onBlock:null,onUnblock:null,onOverlayClick:null,quirksmodeOffsetHack:4,blockMsgClass:"blockMsg",ignoreIfBlocked:!1},null),g=[];function t(e,t){var n=e==window,o=t&&void 0!==t.message?t.message:void 0;if(!(t=b.extend({},b.blockUI.defaults,t||{})).ignoreIfBlocked||!b(e).data("blockUI.isBlocked")){t.overlayCSS=b.extend({},b.blockUI.defaults.overlayCSS,t.overlayCSS||{}),f=b.extend({},b.blockUI.defaults.css,t.css||{}),t.onOverlayClick&&(t.overlayCSS.cursor="pointer"),u=b.extend({},b.blockUI.defaults.themedCSS,t.themedCSS||{}),o=void 0===o?t.message:o,n&&m&&v(window,{fadeOut:0}),o&&"string"!=typeof o&&(o.parentNode||o.jquery)&&(d=o.jquery?o[0]:o,l={},b(e).data("blockUI.history",l),l.el=d,l.parent=d.parentNode,l.display=d.style.display,l.position=d.style.position,l.parent)&&l.parent.removeChild(d),b(e).data("blockUI.onUnblock",t.onUnblock);var i,s,l=t.baseZ,d=h||t.forceIframe?b(''):b(''),a=t.theme?b(''):b(''),c=(t.theme&&n?(c=''):t.theme?(c=''):c=n?'':'',l=b(c),o&&(t.theme?(l.css(u),l.addClass("ui-widget-content")):l.css(f)),t.theme||a.css(t.overlayCSS),a.css("position",n?"fixed":"absolute"),(h||t.forceIframe)&&d.css("opacity",0),[d,a,l]),r=b(n?"body":e),u=(b.each(c,function(){this.appendTo(r)}),t.theme&&t.draggable&&b.fn.draggable&&l.draggable({handle:".ui-dialog-titlebar",cancel:"li"}),y&&(!b.support.boxModel||0 .blockUI"):s.find(">.blockUI"),o.cursorReset&&(1 How To Create Templates On CapCut [2025 Detailed Guide]

How to Create Templates on CapCut

If you are a regular content creator you must be familiar with Capcut as it has gained a lot of popularity among content creators in the last couple of years. The clean user interface and many cool features with the AI integration made video editors fall in love with this application.

One of its most popular features is CapCut templates (interlink to the template page). Capcut templates are pre-designed layouts that include various effects, overlays, and texts, that make video production quick and efficient. In this article, we will explain in detail how you can create capcut templates for yourself for future use as well as how you can become a cap cut creator and create templates that you can post on your profile for public use.

How to create CapCut template on PC - Offline Use

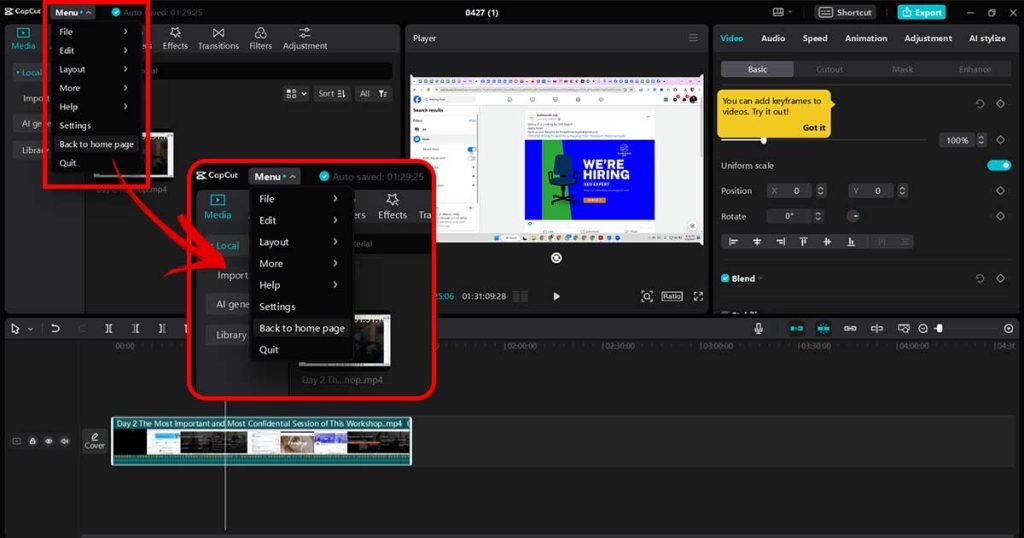
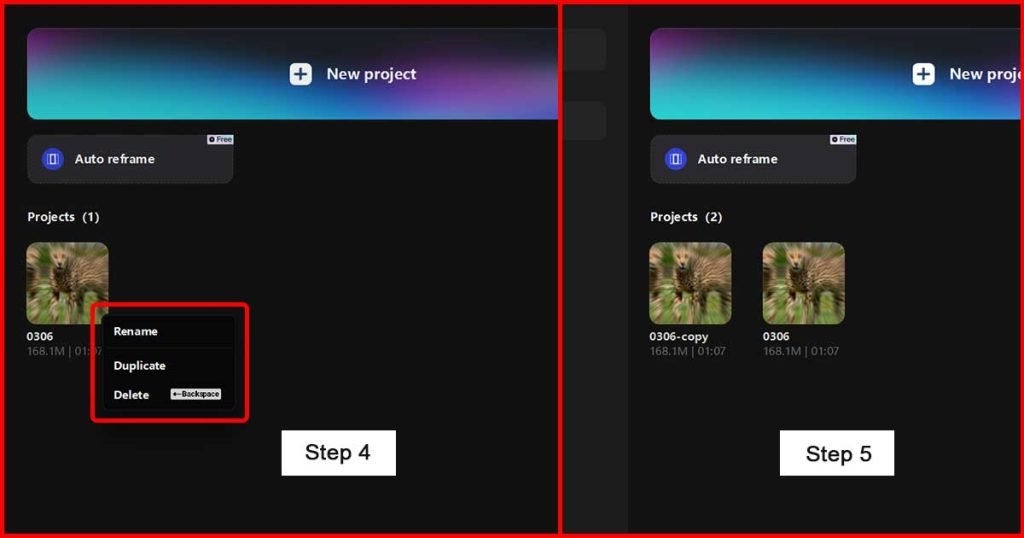
The Capcut mobile app doesn’t allow you to create a template for offline use. You can only create a template for offline use on the Capcut desktop app. There is no specific template creation feature available on Capcut for PC, however, you can edit a video by adding your effects, overlay, logos, and sound and then save it. Later on, replace the videos from the template while keeping other elements in the timeline.

You can download and install the CapCut desktop version on your Windows PC or Mac from the official CapCut website: https://www.capcut.com/tools/desktop-video-editor

Editing CapCut Template

  • First, open CapCut and create a new project by clicking on “+New Project
  • Click on Import to bring video clips, images, and sound effects from your PC. Drag all the media items on the timeline, and arrange them accordingly.
  • You can also add different stickers, effects, transitions, and filters from the top menu.

Exporting CapCut Template

  • Once you are done with the editing part of your video. Click on the Export button to export your video. Give your video a proper name so it will be easy for you to locate it.
  • Depending on its length and PC specifications, the video will take some time to render.
Editing CapCut Template 1.1
Editing CapCut Template 1.2
Duplicating CapCut Template 1.1
Duplicating CapCut Template 1.2

Duplicating the CapCut Template

  • Then go to the home page by clicking Menue and then from the dropdown click on “ Back to Home Page”. You will be returned to the initial home screen of Capcut where you will find all your projects.
  • Right-click on the recent video you edited and then click Duplicate.
  • It will create a copy of your recent project, you can rename it and replace the videos from this new copy. All the other elements including overlays, transitions, and sound effects that you have added to the template will remain intact.

Duplicating the CapCut Template

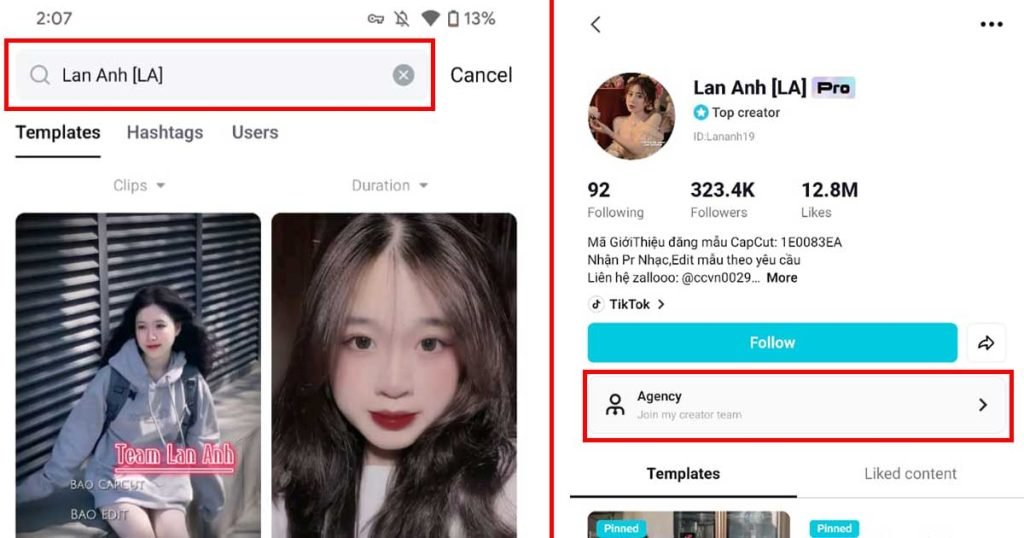
To create capcut templates for the public, you must be a capcut creator and there are certain requirements, that you have to meet to be eligible for CapCut Creator Program. The following are the condition that you have to meet in order to apply for Capcut Creator Program:

  • You are based in the United States
  • Your age is over 18 years
  • You must have good editing skills because you will be providing your video while filling out the application.

How to apply for the Capcut Creator Program from Mobile App

  • After creating your account on CapCut mobile app, head over to Capcut Creator Program homepage. If you are unable to find the application page then ask any creator to send you an invite.
  • If you don’t have any invite follow this method. Go to template and search for a top capcut template creator “LA ANH [LA]”. 
  • Head over to the profile section and you will find an Agency tab. Click on this it will redirect you to the Template Creator page.
  • Once you will submit all the information correctly, capcut will review your application and you will receive a confirmation email from capcut which usually takes 7-10 working days. 
  • Next, you have to fill out some necessary information including your email, one video editing sample, add your social media accounts, and provide a reference code if any.
How to apply for the Capcut Creator Program from Mobile App 1.1
How to apply for the Capcut Creator Program from Mobile App 1.2

If you are a regular content creator you must be familiar with Capcut as it has gained a lot of popularity among content creators in the last couple of years. The clean user interface and many cool features with the AI integration made video editors fall in love with this application.

CapCut Template New Trend

Request A Template

We'll notify you when the template is Ready!